In this article, we will discuss how to install, enable and configure Redis Object cache on CyberPanel. From CyberPanel Version 2.0.3 Cyberpanel provides Redis one-click installation feature.
CyberPanel is one of the emerging and popular choices among web hosting control panels and with its current new feature timeline, CyberPanel developers are introducing more and more features into it. With a team that is very quick with updates and bug fixes, CyberPanel is becoming one of the first choices for a free hosting panel.
Table Of Content:
- How to install Or upgrade the CyberPanel :
- Install Redis and Redis PHP extension on CyberPanel.
- Install Redis Plugin on WordPress.
- Redis setup with Redis WordPress plugins.
- Benchmarks
How to install Or upgrade CyberPanel:
If you are looking for how to install CyberPanel? Then you are in the right place and if you are looking for how to get the latest version of CyberPanel then this article will tell you how you can upgrade CyberPanel to the latest version.
How to install CyberPanel:
Honestly, CyberPanel installation is very easy. It takes 5-20 minutes to install depending on your server specs, and one command to run.
sh <(curl https://cyberpanel.net/install.sh || wget -O - https://cyberpanel.net/install.sh)
How To Configure Redis Object Caching For WordPress On CyberPanel
- September 25, 2020
- Configuration, CyberPanel, Optimizations, Optmizations, Server techniques
- No Comments
Redis is open-source software that is used as a database cache. At times when MySQL becomes a bottleneck for your WordPress installation due to heavy queries, Redis can help reduce that load by using in-memory data structure storage. In this article, we will see how to configure Redis Object Caching for WordPress on CyberPanel using the Redis plugin.
CyberPanel is one of the emerging and popular choices among web hosting control panels and with its current new feature timeline, CyberPanel developers are introducing more and more features into it. With a team that is very quick with updates and bug fixes, CyberPanel is becoming one of the first choices for a free hosting panel.
Slow Website?
Try our Managed Hosting to Supercharge your WordPress.More Details
Currently, CyberPanel stable version is v2.0.3, and the CyberPanel team is about to launch the next version very soon. The v2.0.3 version includes very exciting features and one of those features which CyberPanel has introduced is the Redis Application installation with PHP extension.
To become a partner with CyberLoader Click here.
Table Of Content:
- How to install Or upgrade the CyberPanel :
- Install Redis and Redis PHP extension on CyberPanel.
- Install Redis Plugin on WordPress.
- Redis setup with Redis WordPress plugins.
- Benchmarks
How to install Or upgrade CyberPanel:
If you are looking for how to install CyberPanel? Then you are in the right place and if you are looking for how to get the latest version of CyberPanel then this article will tell you how you can upgrade CyberPanel to the latest version.
How to install CyberPanel:
Honestly, CyberPanel installation is very easy. It takes 5-20 minutes to install depending on your server specs, and one command to run.
sh <(curl https://cyberpanel.net/install.sh || wget -O - https://cyberpanel.net/install.sh)
How to Upgrade CyberPanel:
You can also update CyberPanel using only one command and as the installation, it also takes 5 minutes and a single command.
sh <(curl https://raw.githubusercontent.com/usmannasir/cyberpanel/stable/preUpgrade.sh || wget -O - https://raw.githubusercontent.com/usmannasir/cyberpanel/stable/preUpgrade.sh)
How To Configure Redis Object Caching For WordPress On CyberPanel
- September 25, 2020
- Configuration, CyberPanel, Optimizations, Optmizations, Server techniques
- No Comments
Redis is open-source software that is used as a database cache. At times when MySQL becomes a bottleneck for your WordPress installation due to heavy queries, Redis can help reduce that load by using in-memory data structure storage. In this article, we will see how to configure Redis Object Caching for WordPress on CyberPanel using the Redis plugin.
CyberPanel is one of the emerging and popular choices among web hosting control panels and with its current new feature timeline, CyberPanel developers are introducing more and more features into it. With a team that is very quick with updates and bug fixes, CyberPanel is becoming one of the first choices for a free hosting panel.
Slow Website?
Try our Managed Hosting to Supercharge your WordPress.More Details
Currently, CyberPanel stable version is v2.0.3, and the CyberPanel team is about to launch the next version very soon. The v2.0.3 version includes very exciting features and one of those features which CyberPanel has introduced is the Redis Application installation with PHP extension.
Table Of Content:
- How to install Or upgrade the CyberPanel :
- Install Redis and Redis PHP extension on CyberPanel.
- Install Redis Plugin on WordPress.
- Redis setup with Redis WordPress plugins.
- Benchmarks
To enable and configure Redis Object cache on CyberPanel. here the actual process starts.
How to install Or upgrade CyberPanel:
If you are looking for how to install CyberPanel? Then you are in the right place and if you are looking for how to get the latest version of CyberPanel then this article will tell you how you can upgrade CyberPanel to the latest version.
How to install CyberPanel:
Honestly, CyberPanel installation is very easy. It takes 5-20 minutes to install depending on your server specs, and one command to run.
sh <(curl https://cyberpanel.net/install.sh || wget -O - https://cyberpanel.net/install.sh)
But I recommend you to also read CyberPanel Official tutorial for this.https://cyberpanel.net/docs/installing-cyberpanel/embed/#?secret=H9Q0vWTjfS
How to Upgrade CyberPanel:
You can also update CyberPanel using only one command and as the installation, it also takes 5 minutes and a single command.
sh <(curl https://raw.githubusercontent.com/usmannasir/cyberpanel/stable/preUpgrade.sh || wget -O - https://raw.githubusercontent.com/usmannasir/cyberpanel/stable/preUpgrade.sh)
You can read the official guide for this also.https://cyberpanel.net/docs/upgrading-cyberpanel/embed/#?secret=Bqyl86sftJ
Install Redis and Redis PHP extension on CyberPanel
First of all, I am going with a short introduction to Redis. I know most of you know what Redis is and what are the uses of Redis. But some may be new to Redis so let me explain what it is.
Redis is an in-memory data structure store. Redis is used for caching, Session management, Subscriber base messages. Basically, Redis makes the process quicker. Let me be clear with an example of Twitter. Twitter is using Redis for subscribing, Liking, and all of that. You notice that when we have a new feed on twitter the whole page is not refreshed and you can see the message-like.

That is Redis. That did not allow the refresh of the whole page but adds the new content. Redis is an effective component to improve the speed of the site. If you want to know more about Redis go to their official site by clicking here.
Do you know? You can install Redis using CyberPanel with one click. CyberPanel developers added this new feature to install the Redis directly from the CyberPanel.
In the previous version of CyberPanel, if you wanted to install Redis and configure it, you were required to install it using commands and then you have to install Redis extension from PHP extensions from CyberPanel. But this hustle is about to end in v2.0.3. Now CyberPanel makes it easy for its users.
I am going to explain what you have to do now in v2.0.3.
Install Redis:
To Install Redis first you must have a CyberPanel version v2.0.3. If you have this version then go to https://<your_ip>:8090/ and log in by providing credentials.

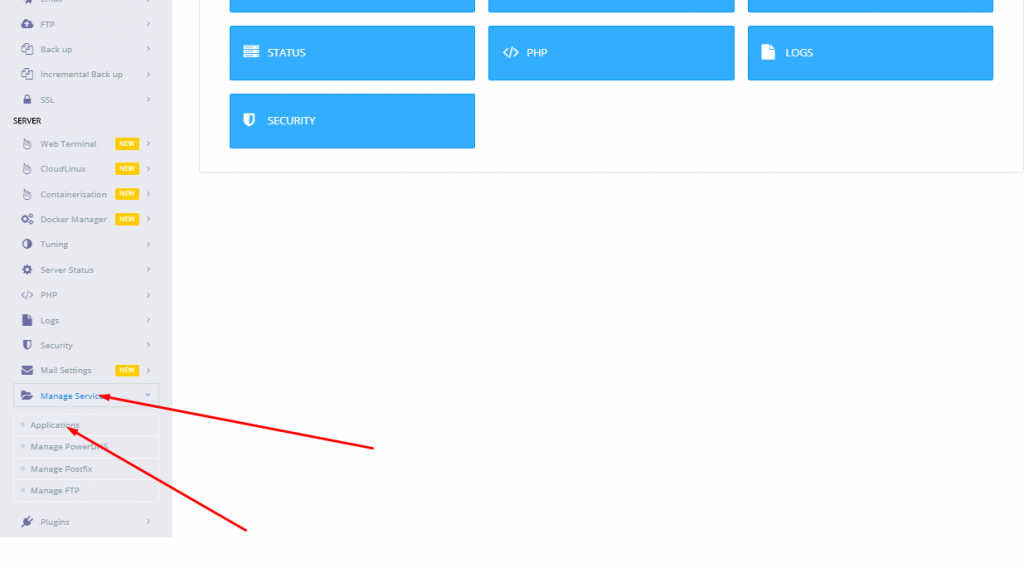
Once you login to your system now go to the ‘Manage Services->Applications‘. Let me make it more clear. Visit this link to install Redis https://<Your_IP>/manageservices/manageApplications.

Once you reach this page. No matter through the Option Stated above or using the link. You can see the option to install Redis Daemon.

Now to Click install button present in front of the Redis on your screen.

Now the real process starts. Once you click the window you can see a popup window appear which shows you the installation process and at the end of the process, you can see the version and all about the Redis information.

Once Installation is completed the page refreshes automatically and you can see that Redis is now installed, How cool is this?
For the removal of Redis, there is also one click in CyberPanel v2.0.3. You can see the status of Redis that it is installed and you can uninstall it by just clicking the remove button on the same page.

This one-click installation is an amazing feature in CyberPanel. Now you are done with the Redis installation its time to install the Redis PHP extension. For this follow the next step.
Install Redis Extension in CyberPanel:
Its time to install the Redis extension on CyberPanel. As you all know this one is not a new feature in CyberPanel. For the installation of Redis Extension go to the PPH->Install Extensions. You know we have an alternate path to access this point also and that is the link https://<Your_IP>/managephp/installExtensions

When you are on this page. Here you have to select a PHP version to install the extension for. Mostly the version that you are using for your site on which you want to setup Redis.

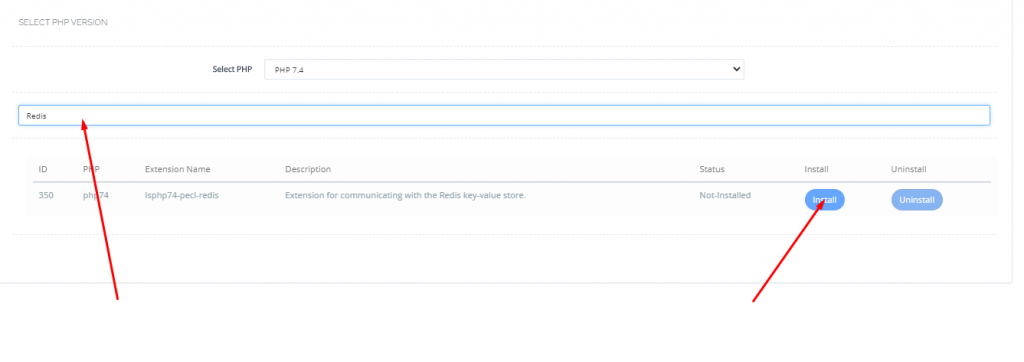
Select the required version and install the Redis extension for this version. For me, I selected PHP 7.4 for installation. Because I use this for my site. After selection, you search Redis in the search box and you get the required result. And you can see the install button.

Once you clicked the install button you can see the installation process.

After Installation go back and check the status of the extension.

All done from the CyberPanel. Now it’s time to set up on your WordPress site.
How To Configure Redis Object Caching For WordPress On CyberPanel
- September 25, 2020
- Configuration, CyberPanel, Optimizations, Optmizations, Server techniques
- No Comments
Redis is open-source software that is used as a database cache. At times when MySQL becomes a bottleneck for your WordPress installation due to heavy queries, Redis can help reduce that load by using in-memory data structure storage. In this article, we will see how to configure Redis Object Caching for WordPress on CyberPanel using the Redis plugin.
CyberPanel is one of the emerging and popular choices among web hosting control panels and with its current new feature timeline, CyberPanel developers are introducing more and more features into it. With a team that is very quick with updates and bug fixes, CyberPanel is becoming one of the first choices for a free hosting panel.
Slow Website?
Try our Managed Hosting to Supercharge your WordPress.More Details
Currently, CyberPanel stable version is v2.0.3, and the CyberPanel team is about to launch the next version very soon. The v2.0.3 version includes very exciting features and one of those features which CyberPanel has introduced is the Redis Application installation with PHP extension.
Table Of Content:
- How to install Or upgrade the CyberPanel :
- Install Redis and Redis PHP extension on CyberPanel.
- Install Redis Plugin on WordPress.
- Redis setup with Redis WordPress plugins.
- Benchmarks
How to install Or upgrade CyberPanel:
If you are looking for how to install CyberPanel? Then you are in the right place and if you are looking for how to get the latest version of CyberPanel then this article will tell you how you can upgrade CyberPanel to the latest version.
How to install CyberPanel:
Honestly, CyberPanel installation is very easy. It takes 5-20 minutes to install depending on your server specs, and one command to run.
sh <(curl https://cyberpanel.net/install.sh || wget -O - https://cyberpanel.net/install.sh)
But I recommend you to also read CyberPanel Official tutorial for this.https://cyberpanel.net/docs/installing-cyberpanel/embed/#?secret=H9Q0vWTjfS
How to Upgrade CyberPanel:
You can also update CyberPanel using only one command and as the installation, it also takes 5 minutes and a single command.
sh <(curl https://raw.githubusercontent.com/usmannasir/cyberpanel/stable/preUpgrade.sh || wget -O - https://raw.githubusercontent.com/usmannasir/cyberpanel/stable/preUpgrade.sh)
You can read the official guide for this also.https://cyberpanel.net/docs/upgrading-cyberpanel/embed/#?secret=Bqyl86sftJ
Install Redis and Redis PHP extension on CyberPanel
First of all, I am going with a short introduction to Redis. I know most of you know what Redis is and what are the uses of Redis. But some may be new to Redis so let me explain what it is.
Redis is an in-memory data structure store. Redis is used for caching, Session management, Subscriber base messages. Basically, Redis makes the process quicker. Let me be clear with an example of Twitter. Twitter is using Redis for subscribing, Liking, and all of that. You notice that when we have a new feed on twitter the whole page is not refreshed and you can see the message-like.

That is Redis. That did not allow the refresh of the whole page but adds the new content. Redis is an effective component to improve the speed of the site. If you want to know more about Redis goto there official site by clicking here.
Do you know? You can install Redis using CyberPanel in one click. CyberPanel developers added this new feature to install the Redis directly from the CyberPanel.
In the previous version of CyberPanel, if you wanted to install Redis and configure, you were required to install it using commands and then you have to install Redis extension from PHP extensions from CyberPanel. But this hustle is about to end in v2.0.3. Now CyberPanel makes it easy for its users.
I am going to explain what you have to do now in v2.0.3.
Install Redis:
To Install Redis first you must have a CyberPanel version v2.0.3. If you have this version then go to https://<your_ip>:8090/ and log in by providing credentials.

Once you login to your system now go to the ‘Manage Services->Applications‘. Let me make it more clear. Visit this link to install Redis https://<Your_IP>/manageservices/manageApplications.

Once you reach this page. No matter through the Option Stated above or using the link. You can see the option to install Redis Daemon.

Now to Click install button present in front of the Redis on your screen.

Now the real process starts. Once you click the window you can see a popup window appear which shows you the installation process and at the end of the process, you can see the version and all about the Redis information.

Once Installation is completed the page refreshes automatically and you can see that Redis is now installed, How cool is this?
For the removal of Redis, there is also one click in CyberPanel v2.0.3. You can see the status of Redis that it is installed and you can uninstall it by just clicking the remove button on the same page.

This one-click installation is an amazing feature in CyberPanel. Now you are done with the Redis installation its time to install the Redis PHP extension. For this follow the next step.
Install Redis Extension in CyberPanel:
Its time to install the Redis extension on CyberPanel. As you all know this one is not a new feature in CyberPanel. For the installation of Redis Extension go to the PPH->Install Extensions. You know we have an alternate path to access this point also and that is the link https://<Your_IP>/managephp/installExtensions

When you are on this page. Here you have to select a PHP version to install the extension for. Mostly the version that you are using for your site on which you want to setup Redis.

Select the required version and install the Redis extension for this version. For me, I selected PHP 7.4 for installation. Because I use this for my site. After selection, you search Redis in the search box and you get the required result. And you can see the install button.

Once you clicked the install button you can see the installation process.

After Installation go back and check the status of the extension.

All done from the CyberPanel. Now its time to setup on your WordPress site.
Install Redis Plugin on WordPress:
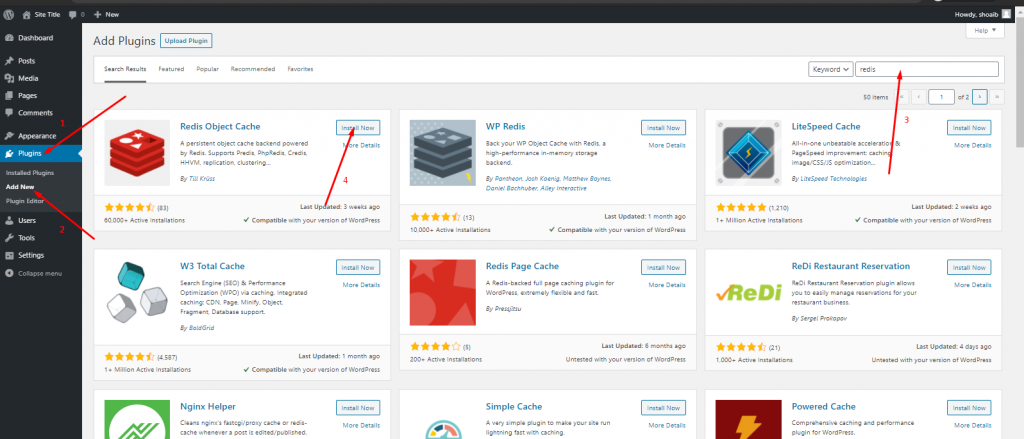
Now its time to install Redis on WordPress. The installation of every plugin is almost the same.
- Go to the admin dashboard in wp-admin
- Go to plugin
- Add new
- Search Redis in the bar and you can see the Redis plugin
- Click on install and then activate

How to perform a Stress Test on your Web application using CyberLoader?
Follow CyberLoader on Facebook / Twitter.
Join our Facebook group.
